In both our Advanced Bitcoin Privacy and Advanced Bitcoin Security guides we outline why it’s so important to make sure you connect BitBox Wallet to Umbrel. If you’re not connected to your own Full Bitcoin Node then any transaction you send or receive, your balances, wallet info and more can all be tracked, recorded and tied to your IP Address and identity.
This extremely private information about your finances can then be shared with governments, sold to unknown third parties or worse, hacked and sold to criminals and scammers. The best way to counter these risks is to address the data leak at its source.
Although Umbrel is super easy to use, it can be tough for people that are new to it as there’s a lot of terms that you likely aren’t familiar with. But. That’s why we’re here! To give you the best educational content out there and help you use Bitcoin the way it was intended.
Contents
Why Connect BitBox Wallet To Umbrel?
Everything in Bitcoin is done through nodes
If it’s not your node, then someone else knows your balance and spending info and can also feed you false information creating all sorts of security concerns. For example they could allow a transaction that isn’t following the rules of the Bitcoin network. If you then try to spend those bitcoins somewhere else they’ll be rejected by the rest of the network and it’s as good as them stealing your funds.
Most Bitcoin Wallets by default connect to a public server (usually Electrum) in order to access all the information on the Bitcoin Blockchain and to broadcast new transactions. While this works and is great to get people started quickly, it’s not very private or secure. This is because as stated, the people that own those public servers you’re connected to can see everything you do.
While this seriously affects both your Bitcoin Security and Bitcoin Privacy, the natural way that people learn about Bitcoin means that it’s not until later that they understand enough about What A Bitcoin Wallet Is, how it works and why it’s so critical to run your own node. Fear not though!
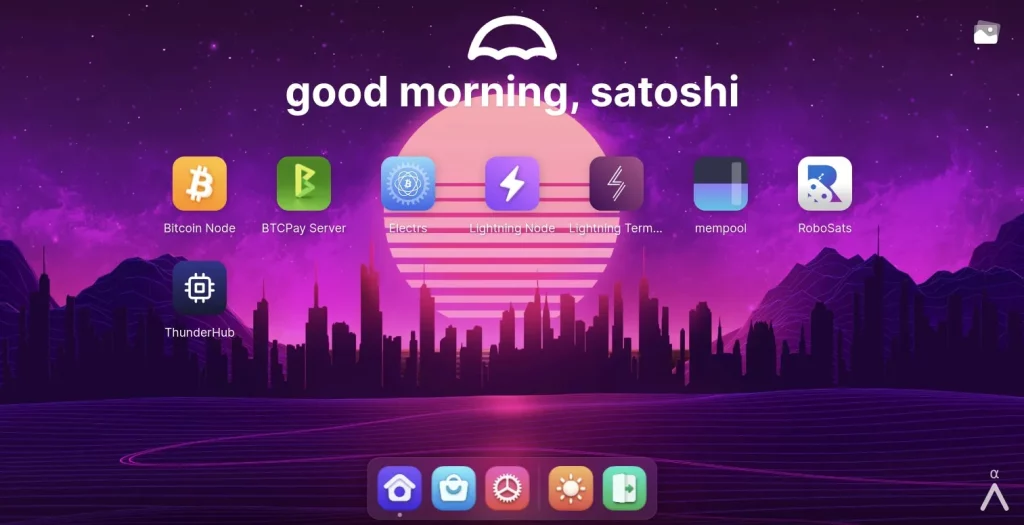
Umbrel not only makes running a Full Bitcoin Node cheap, simple and fun, it also makes it super easy to connect all your wallets to it so your transactions and balances stay safe and private.
What Is Electrum?
At its core Electrum is a lightweight Bitcoin wallet. In order to achieve this speed and fast setup time it uses a client and server architecture. The Electrum wallet (client) connects to the Electrum Server and this server can be run by anyone. On an Umbrel node, the Electrum Server is also run on the node making it private and fully under your control.
As Electrum was created way back in November 2011, many wallet applications have integrated it into their code and support for it is near universal. It’s also Free and Open Source Software (FOSS) and many public servers are available to connect to. By default the BitBoxApp will connect to a public Electrum Server, but it’s much better to run your own Private Electrum server and connect to that.
Before You Begin
In order to connect your BitBoxApp Wallet (or any wallet for that matter) to your Umbrel, you’ll need to make sure you have a few things setup:
- Bitcoin Core: Install and fully sync the Bitcoin Node app on your Umbrel
- Electrum Server: Install the Electrs app on your Umbrel
- BitBoxApp: Install the BitBoxApp Wallet on your computer or phone
Make sure to fully verify that what you’re installing is the legitimate BitBoxApp and not some random piece of malware that will steal your coins.
Tor
In order to connect to your Umbrel node, your computer or phone also needs to be connected to the Tor network. Some wallets have this built in, but BitBoxApp doesn’t, so you’ll need to download and install it separately. How you do this will depend on what operating system you’re running. Also note that connecting to the Tor network is separate to the Tor Browser.
Windows: Download and install the Windows Tor Expert Bundle
Ubuntu: Open a terminal and run:
sudo apt-get install torMacOS: Open a terminal and install the Homebrew Package Manager by running:
/bin/bash -c "$(curl -fsSL https://raw.githubusercontent.com/Homebrew/install/HEAD/install.sh)"Then install Tor by running:
brew update && brew install torAndroid: Download and install Orbot for your phone, then open it up and click the big onion icon.
iOS: Download and install Orbot for your phone, then open it up and click the big onion icon.
How To Connect BitBox Wallet To Umbrel
Step 1: Open BitBoxApp Settings
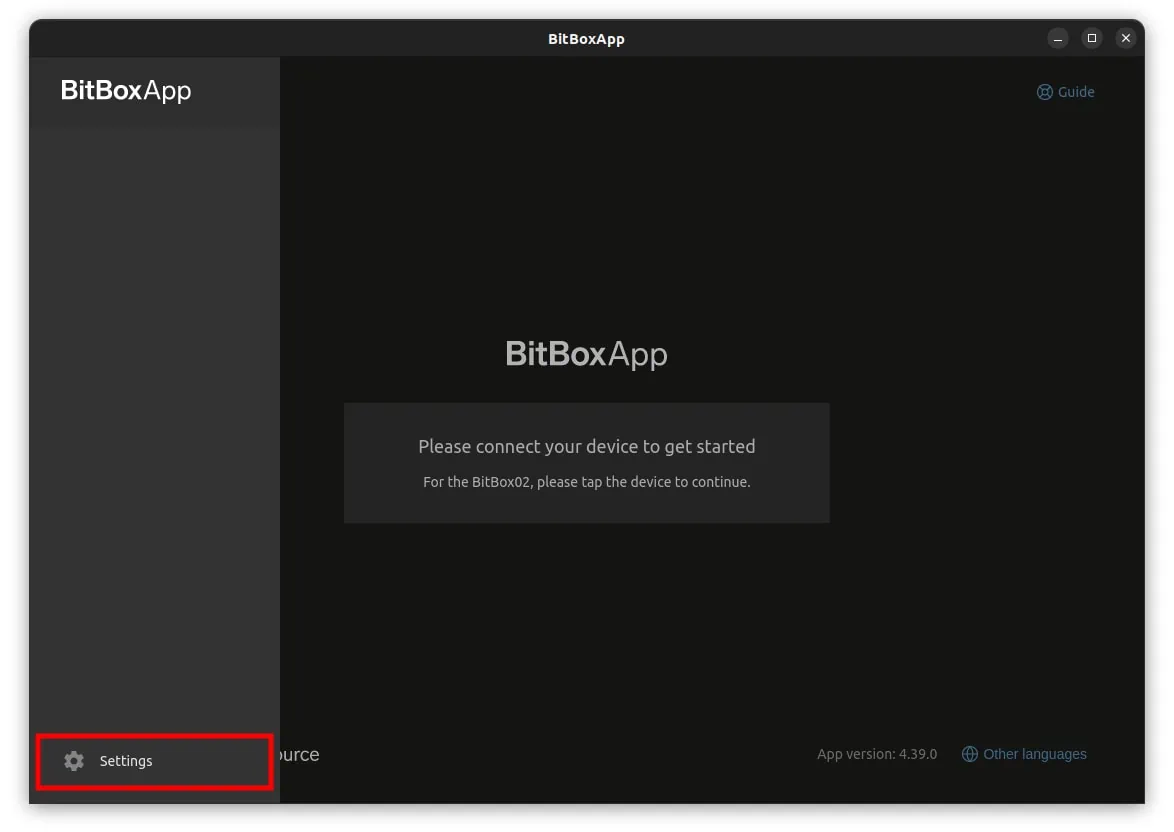
Open the BitBoxApp and click on the menu icon in the top left hand corner. On the side panel that slides out, click on the Settings button.
Step 2: Get Your Electrum Server Details
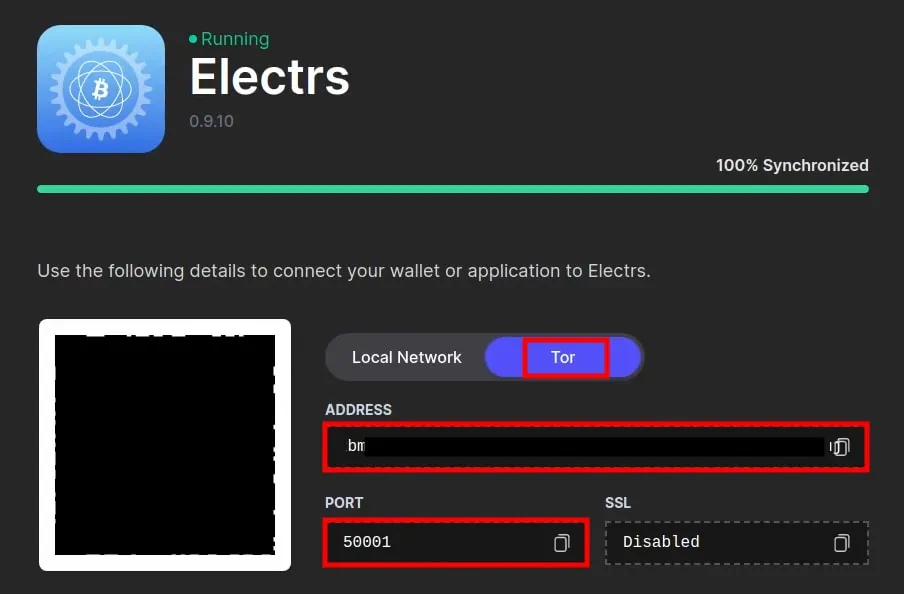
Next, you’ll need to locate your Electrum Server Details. This can be either a clear net address such as 127.0.0.1 or a Tor host name or .onion address. The Umbrel OS has different Apps for different things and to find the Electrum details you have to install and then open the Electrs Umbrel App.
Once open, we recommend selecting the Tor address as most people don’t have the connection to their Umbrel Full Node setup with a HTTPS certificate which means it’s not encrypted. Even on a local LAN this can be dangerous if you have random IoT devices or other users also connected. Tor is encrypted by default, so it’s much safer.
Step 3: Enable Tor Proxy & Restart
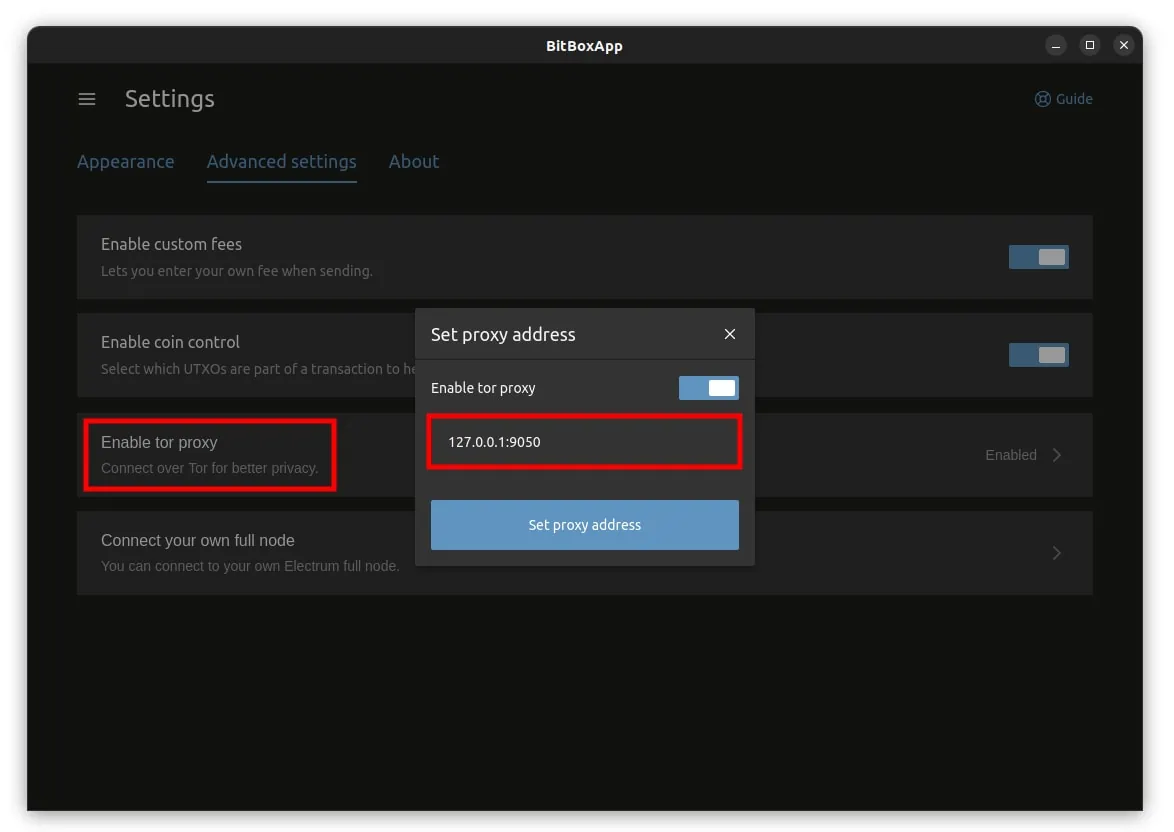
Click on the Advances Settings tab, then on the Enable Tor Proxy line. This will open up a new popup box, enable the Enable Tor Proxy toggle and then enter in “127.0.0.1:9050” and click Set Proxy Address.
Restart the BitBoxApp and go back to the Advanced Settings tab, the text on the right hand side of the Enable Tor Proxy line should now say “Enabled”.
Step 4: Remove Default Servers
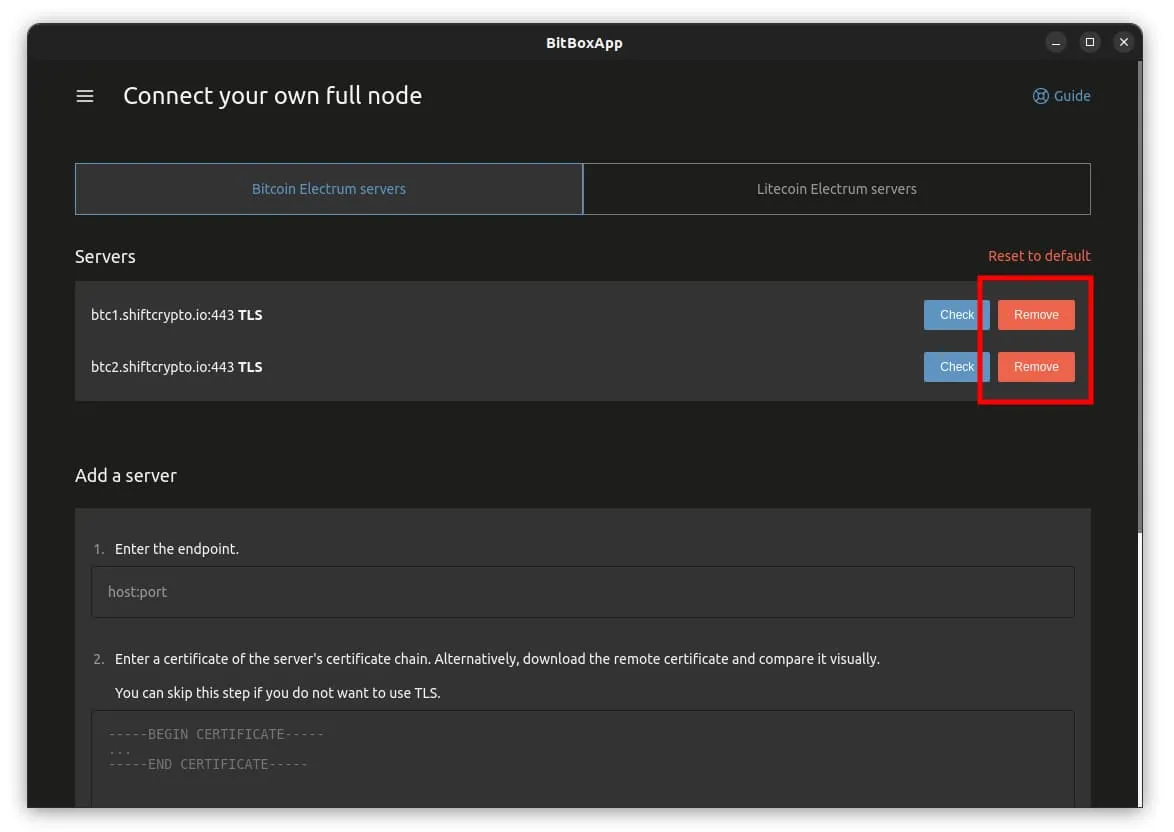
To ensure that the only node the BitBoxApp connects to is your node, we first need to remove the default servers. Under the same Advanced Settings tab, click on the Connect Your Own Full Node line and then Remove both of the default servers.
Step 5: Enter Your Electrum Server Details & Test
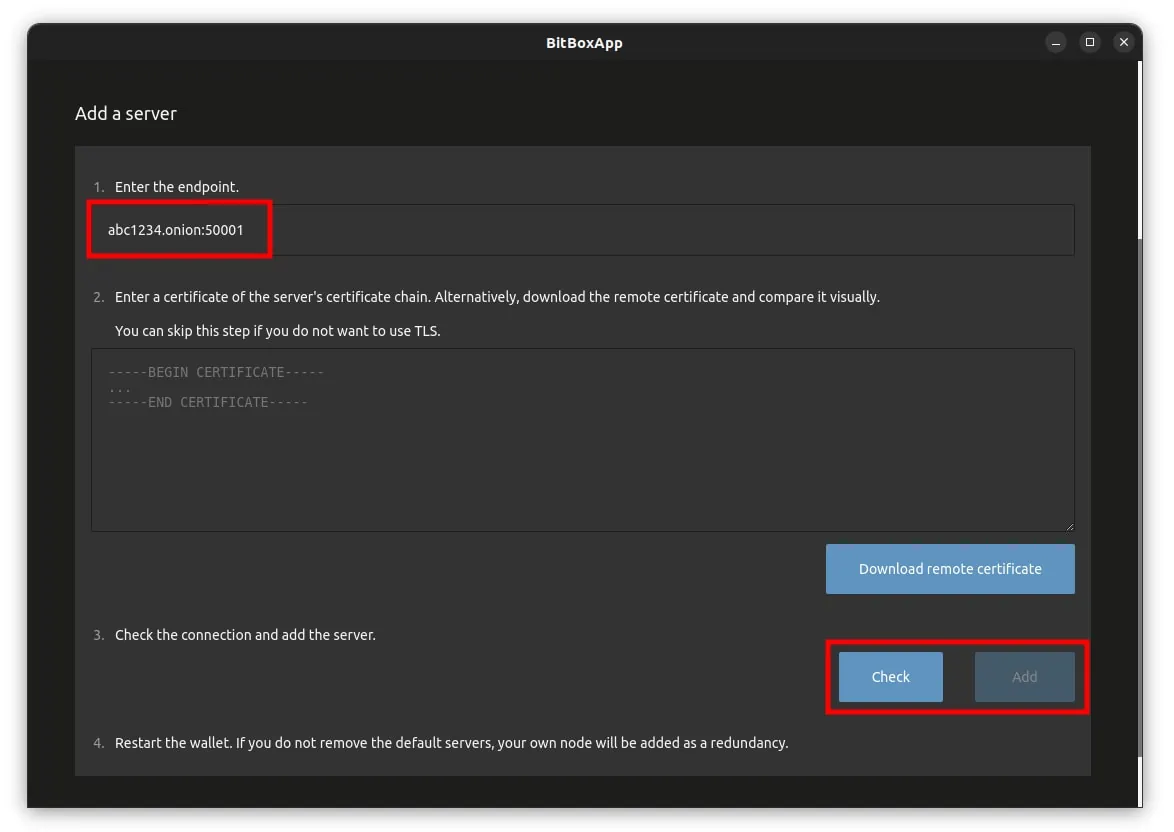
In the same Connect Your Own Full Node area, scroll down to the Add A Server section at the bottom. Copy across the Address and Port details to the BitBoxApp Wallet. If you are using a SSL Certificate with your connection, then enter these details in as well. As we’re connecting over Tor, this isn’t required and so is left empty.
Once everything is entered, hit the Check button. This will connect to your Umbrel node through the Tor network. Be aware that this can take a minute or two, so just be patient and let it do its thing.
If successful, a popup window will appear saying Successfully established a connection to… and you can close it by pressing OK. Finally, once this connection check has completed successfully, click the Add button and restart your BitBoxApp.
After restarting, if you go back into the Connect Your Own Full Node settings area, it should list your node and only your node in the Servers list. Congratulations, you have successfully connected to your Umbrel node over Tor! 🥳
FAQ
Is BitBoxApp A Good Wallet?
BitBoxApp has a lot of very good features included in it such as the ability to connect via Tor, the ability to connect your own full node as well as UTXO labeling and Coin Control. These make it quite a good wallet, however it only works with their BitBox02 hardware wallet. We Recommend Sparrow as it has all these features and more, plus works with most major Crypto Wallets.
What Coins Does BitBoxApp Support?
The BitBoxApp supports over 1,500 various coins and tokens. You can see a full and updated list of these here.

